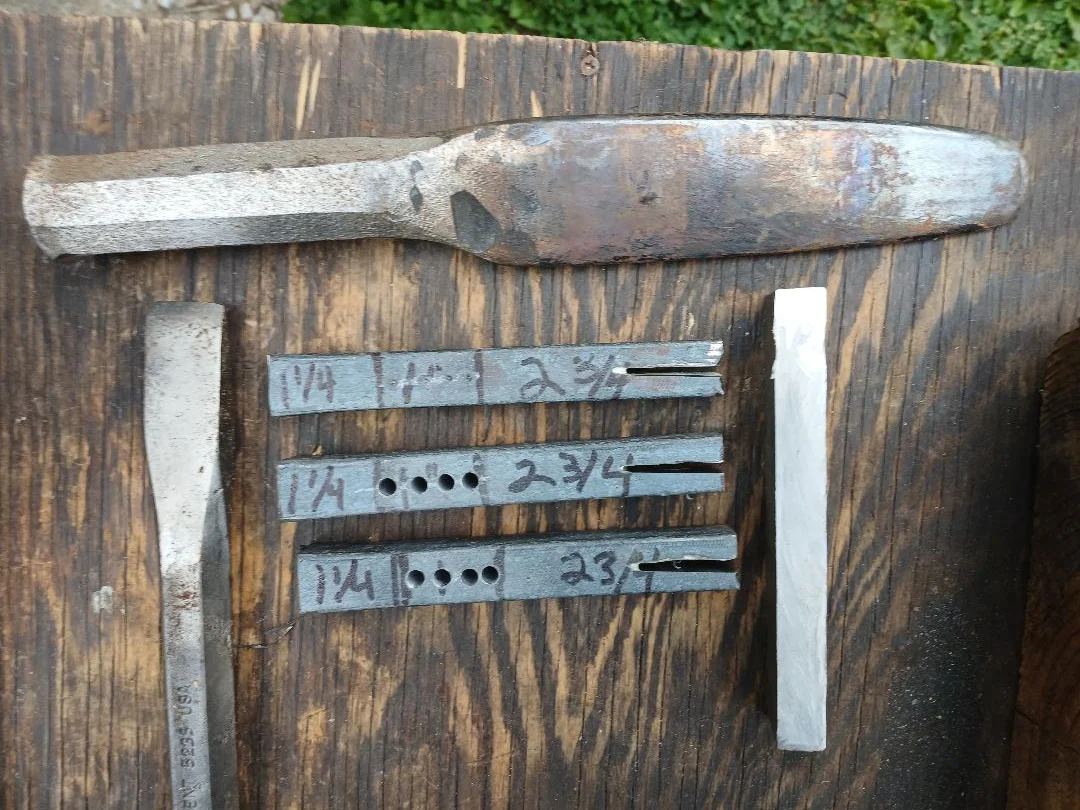
Making tomahawk billets today to forge this weekend

Ohio Rusty

Well-known member
Bronze Member
Joined
Apr 25, 2025
Messages
100
The body is medium hard carbon steel. I got all the measurements marked off, the punch marks done to drill the holes for the splitting chisel for the eye. Two of them are done. After that the eye drift tool will open up the split left by the chisel for the eye. I split the end already and that shiny piece of metal is a 1/2 inch thick piece of 1075 high carbon steel. That will be forged into a wedge, cut to length then that will be forge welded into the split for the cutting edge. All that is left is the final forging to shape, drawing out of the blade, any filing and clean up. I'll harden the high carbon edge then temper it back so it will take a super sharp edge. These should make really nice light but well balanced hammer poll hawks. I can always change the hammer poll to a spike for a spike hawk if need be.
Ohio Rusty ><>
 

Attachments

  • tomahawk billets.webp
    tomahawk billets.webp
    165.2 KB
That’s the kind of craftsmanship making modern factory tomahawks nervously sweat on hardware store shelves
 
The body is medium hard carbon steel. I got all the measurements marked off, the punch marks done to drill the holes for the splitting chisel for the eye. Two of them are done. After that the eye drift tool will open up the split left by the chisel for the eye. I split the end already and that shiny piece of metal is a 1/2 inch thick piece of 1075 high carbon steel. That will be forged into a wedge, cut to length then that will be forge welded into the split for the cutting edge. All that is left is the final forging to shape, drawing out of the blade, any filing and clean up. I'll harden the high carbon edge then temper it back so it will take a super sharp edge. These should make really nice light but well balanced hammer poll hawks. I can always change the hammer poll to a spike for a spike hawk if need be.
Ohio Rusty ><>
Nice post, good information... When I have done inserts for hawks, wood chisels etc. I would usually raise several burrs on the insert piece (like rasp teeth) to make it easier to get the insert positioned for the first weld (when you close the hot split piece over the colder harder insert, the little teeth bite and hold so you can easily make the weld.. (just a hint so if someone is having a problem it's something they can try). I usually folded my hawks from wrought or mild steel (cost), even poled heads (because I'm not fond of punching deep holes) and did a lot of work at events with a fairly primitive focus and people that wanted to watch things being made from start to finish.

Thanks Rusty for a great post that we can hang additional thoughts on... good images too, that is such a help for folks that are going to give it a go (it kinda proves it's possible).
 
Last edited:
FPDoc said:
Nice post, good information... When I have done inserts for hawks, wood chisels etc. I would usually raise several burrs on the insert piece (like rasp teeth) to make it easier to get the insert positioned for the first weld (when you close the hot split piece over the colder harder insert, the little teeth bite and hold so you can easily make the weld.. (just a hint so if someone is having a problem it's something they can try). I usually folded my hawks from wrought or mild steel (cost), even ...

Really interesting method, those raised burrs acting like mechanical bite points make a lot of sense for alignment. That kind of hands-on refinement is exactly what helps beginners avoid slipping or misalignment during the first weld.
 
Back
Top